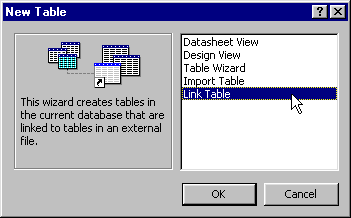
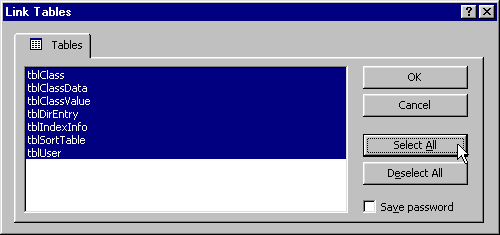
The Microsoft Access 97 database that ships with the DirList2ODBC driver demonstrates the driver's functionality in an easy-to-use environment. To launch the file, go into the directory that you installed it into and run DirList2.mdb. Or, launch Microsoft Access 97 or higher and then open the DirList2.mdb file from there. When you open the file, the following menu should appear:
In the Access database, click on the button that corresponds to the form that you want to go into. Or, click on the buttons in the picture above for that form's documentation.
Directory Entries (tblDirEntry and tblClassData):
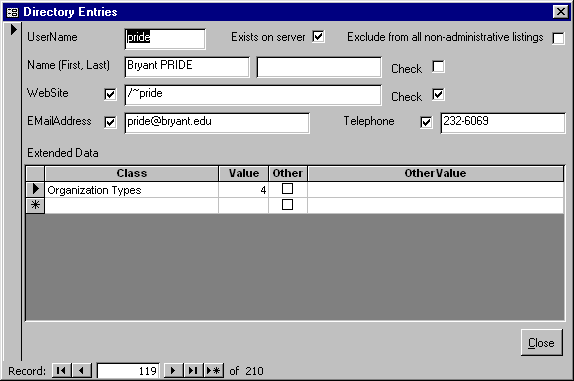
This form allows you to edit the directory entries and any extended data for each entry. To assign an extended value to an entry, simply specify and class and value in the subform. If you want to specify a value that is not predefined, simply place a check in Other and type in the value in OtherValue. Note that unchecking Other will clear anything in OtherValue, and enabling Other will clear out the normal Value field. This happens because the DirList2 server physically stores only one of the two values depending on whether or not Other is checked (this is mapped to HasOtherValue in tblDirEntry). Note that the Value field should correspond with an actual value ID defined in tblClassValue for that class.
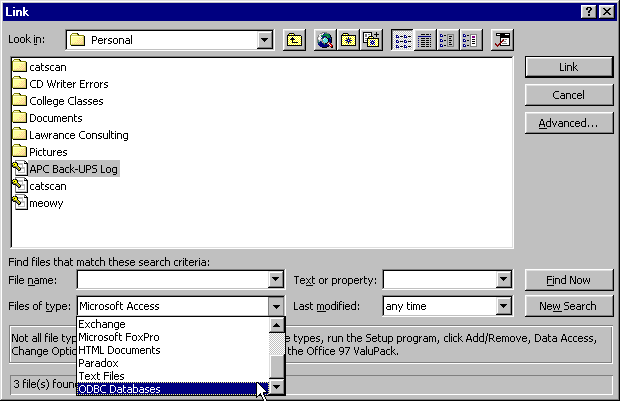
If you want to search for a record, simply click in the field that you want to search and select Find from the Edit menu:
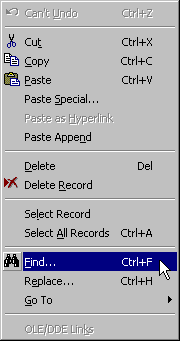
In the below dialog box, simply type in the value that you want to search for. Note that the fastest searches are those that are done on primary key fields; other searches might take a few seconds to a minute, depending on the size of the index file. Searching for values within fields is supported on every table because that functionality is implemented within Access rather than relying solely on the ODBC driver.
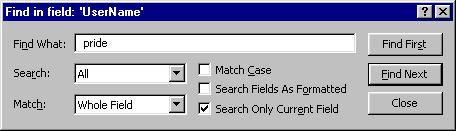
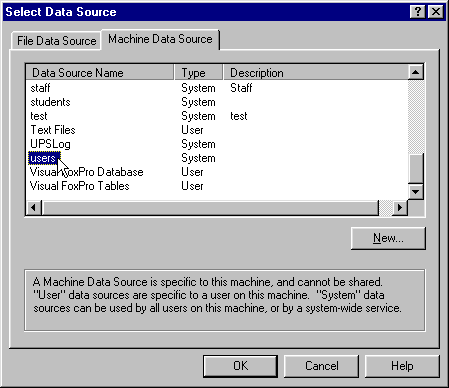
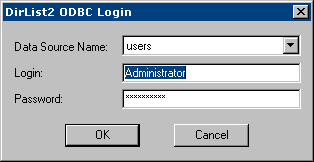
The above example was used to bring up the "pride" user which was used on the previous page. It's that easy!
Extended Data Classifications (tblClass and tblClassValue):
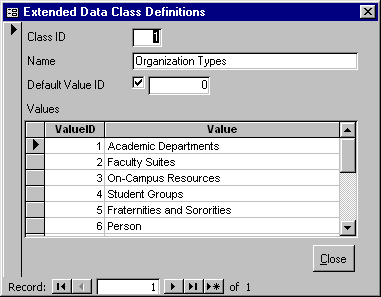
With this form, you can define extended data classifications and specify their values. You can also tell DirList2 to automatically assume a value ID for directory entries that do not have an entry for a given extended data type by enabling the checkbox in Default Value ID and specifying a value ID. Use the values in the ValueID column when filling out the Value field in the Directory Entries form. Note that Class IDs can only be one of 32 values, and these values are in the set of 2 raised to any value between and including 0 to 31. This means that 1, 2, 4, 8, 16, 32, 64, 128, 256, 512, 1024, and so on are valid class IDs, but 3, 5, 6, 7, 9, 10, 11, 12, 13, 14, 15, 17, and so on are are invalid and will return an error if you try to create a class with such an ID.
Web Sorting Table Definitions (tblSortTable):
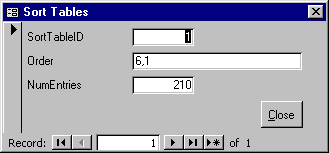
You can define sort tables with this form. Refer to the server documentation on sort tables for more information on the Order string. The NumEntries field, which is read-only, shows how many pointers currently exist in the sort table in the index. This is usually equal to the number of entries in tblDirEntry.
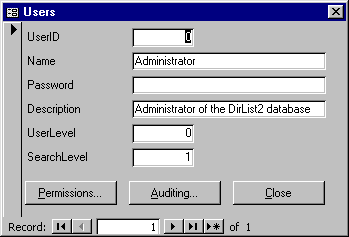
This form allows you to add, remove, and edit users in the database, set the user level, and modify the search level. Note that the Administrator user will always exist, and its user ID is always zero. To set the permissions, click on the Permissions button, and to set the auditing click on the Auditing button.
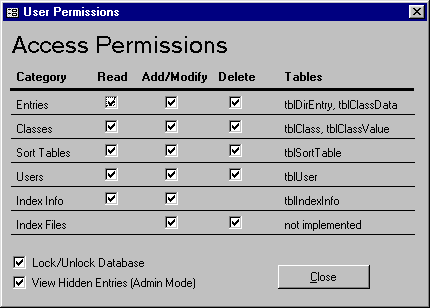
In this form, you can enable and disable the actions that a user is allowed to do. When View Hidden Entries (Admin Mode) is checked, CanViewHiddenEntries in tblDirEntry gets enabled and the administrative mode will work with that user.
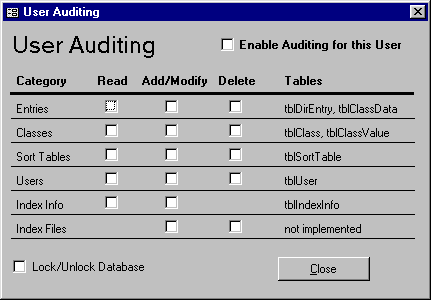
In this form, you can set the actions that will be audited for a user. In order for the auditing to work, Enable Auditing for this User must be checked, and the Audit and AuditEMail fields in tblIndexInfo must be set. Note that auditing Lock/Unlock is not suggested because the other categories will lock and unlock the database in a future version of the driver, generating either 2 or 3 messages per single operation! It's there anyway because the server supports this type of auditing.
Database Configuration (tblIndexInfo):
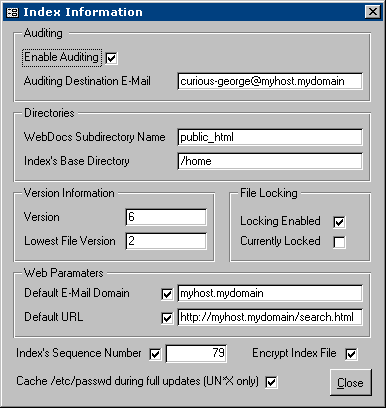
This form allows you to edit the global values for an index while viewing various read-only status variables. To enable auditing for the index file, place a check in Enable Auditing and specify an e-mail address to send auditing messages to. If no e-mail address is specified, no e-mail messages are sent (where would it send them to?).
The WebDocs Subdirectory Name field is the name of the subdirectory that DirList2 Server will poke into for every directory entry that has CheckWebSite in tblDirEntry enabled when performing an update on the index. The Index's Base Directory tells DirList2 Server what directory contains the actual directories that are associated with the directory entries. These directory names are put into the UserName field in tblDirEntry when new directories under the Base Directory are created on the server and after the index is updated.
For version information on the index file, look at the Version and Lowest File Version fields. The Version field is the minor version number of the index file, and Lowest File Version is the lowest minor version of DirList2 Server required to successfully read and write to the file without damaging it. This field enables newer versions of DirList2 Server to tag its version into the file while allowing previous versions that use the exact same file format to still use the same index file.
The Locking Enabled checkbox allows you to enable or disable locking functionality on the server. Future versions of DirList2 Server might have this feature always enabled. When an index is currently locked, Currently Locked will be set; this is a read-only field.
The Default E-Mail Domain is appended to a person's username when that user is added to an index during an update. DirList Server 2.6 and higher looks up the Default URL when either no index is given or nothing is given on a web query. At the moment, only the Default URL in dirlist_indexes/users.idx2 will be used. Default URLs in other indexes are ignored.
To enable index sequence numbers, place a check in the checkbox next to Index's Sequence Number. Note that version 2.1 and higher of DirList2 Server always has sequence numbers enabled, and any attempts to disable it will not succeed. The current sequence number is read-only, and the server automatically increments it each time the index is changed.
For added security, you can encrypt the index file by placing a check in Encrypt Index File. DirList2 Server will transparently apply an encryption algorithm to the index file; the database is exactly the same either way, but the index file is usually larger when it is encrypted.
For faster index updating, check "Cache /etc/passwd during full updates (UN*X only)" if you are running the server on a POSIX system. This has no effect on non-POSIX systems such as Windows NT unless if you happened to compile and run the server in a POSIX subsystem such as Cygwin.