Getting Started - Developer: Difference between revisions
No edit summary |
No edit summary |
||
| Line 18: | Line 18: | ||
#*You can develop and test Thunderforce even if you don't have API access in your main Salesforce.com organization or if you don't use Salesforce.com at all | #*You can develop and test Thunderforce even if you don't have API access in your main Salesforce.com organization or if you don't use Salesforce.com at all | ||
#[[Getting Started - Developer#Thunderforce testing profile in Thunderbird|Create and configure a Thunderforce testing profile in Thunderbird]] | #[[Getting Started - Developer#Thunderforce testing profile in Thunderbird|Create and configure a Thunderforce testing profile in Thunderbird]] | ||
#[[Getting Started - Developer#Thunderforce | #[[Getting Started - Developer#Eclipse configurations for running and debugging Thunderforce|Create the Eclipse configurations for running and debugging Thunderforce]] | ||
#Familiarlize yourself with [[Test framework|Thunderforce's test framework]] | #Familiarlize yourself with [[Test framework|Thunderforce's test framework]] | ||
#Grab a module and develop it (module list is pending the [[Architectural review and refinement|architectural review's]] completion) | #Grab a module and develop it (module list is pending the [[Architectural review and refinement|architectural review's]] completion) | ||
| Line 144: | Line 144: | ||
##*Extensions can be installed by selecting "Add-ons" in the "Tools" menu and then clicking on the "Install..." button in the "Extensions" tab | ##*Extensions can be installed by selecting "Add-ons" in the "Tools" menu and then clicking on the "Install..." button in the "Extensions" tab | ||
==Thunderforce run and debug | ==Eclipse configurations for running and debugging Thunderforce== | ||
*'''This and | The following instructions guide you through the process of creating Eclipse configurations for running an debugging Thunderforce. | ||
*Before trying out new code in Thunderforce, it is advised that you run the basic unit tests to ensure that you don't get silly JavaScript compilation errors and that your new code passes basic positive and negative test cases. | |||
You should repeat this process for each unit test and runtime configuration. The following run and debug configurations are advised: | |||
*'''Thunderforce:''' Run Thunderbird with the ThunderforceTest profile. This is meant for manual integration and functionality testing | |||
*'''Thunderforce Basic Tests:''' Run the simple unit and sanity test cases to ensure that your code change compiles properly and didn't break anything obvious. This is typically run before trying out a new change with the full Thunderforce run configuration | |||
*'''Thunderforce Normal Tests:''' Run the normal unit and integration test cases. When tests of this type are written, running this will likely become a check-in requirement | |||
*'''Thunderforce Extra Tests:''' Run the integration tests that typically take a long time to run. These tests are important, but do not need to be run with every single change | |||
*'''Thunderforce All Tests:''' Run all of the aforementioned tests. CruiseControl might be used to automatically run this in a cycle whenever new code exists | |||
To create a Thunderforce run configuration, perform the following steps: | |||
#Select "Run..." from the "Run" menu in Eclipse | |||
#Right-click on "C/C++ Local Application" and select "New" from the pop-up menu | |||
#Give this run configuration a meaningful name, such as a name mentioned above (Thunderforce, Thunderforce Basic Tests, etc) | |||
#Select "mozilla" as the project for this run configuration | |||
#Select "dist/bin/thunderbird-bin" or "dist/bin/thunderbird.exe" in the "C/C++ Application" field, depending on which operating system you are running. The "Search Project..." button can be used to located thunderbird-bin or thunderbird.exe | |||
#Use "-no-remote -P ThunderforceTest" without the quotes as the program arguments in the "Arguments" tab | |||
#Use "${workspace_loc:mozilla}/dist/bin" without the quotes as the working directory | |||
#Add the following environment variables if using Linux. If you are using Windows, skip this step<br><table border="1"><tr><td>'''Variable'''</td><td>'''Value'''</td></tr><tr><td>LD_LIBRARY_PATH</td> <td>${workspace_loc:mozilla}/dist/bin:${workspace_loc:mozilla}/dist/bin/plugins</td> </tr><tr><td>LIBRARY_PATH</td> <td>${workspace_loc:mozilla}/dist/bin:${workspace_loc:mozilla}/dist/bin/components</td> </tr><tr><td>moz_debug</td> <td>1</td> </tr><tr><td>moz_debugger</td> <td>gdb</td> </tr><tr><td>MOZ_PROGRAM</td> <td>${workspace_loc:mozilla}/dist/bin/thunderbird-bin</td> </tr><tr><td>MOZILLA_FIVE_HOME</td> <td>${workspace_loc:mozilla}/dist/bin</td> </tr></table> | |||
#Leave the environment variable "Append environment to native environment" choice selected | |||
Revision as of 20:24, 12 August 2007
|
This document is under active development and will be completed in the near future -- on or before August 13th To get started as a developer, you will need to install and set up various programs. It's definitely possible to use alternatives for the proposed tools, though the tools listed below are the ones that I am accustomed to in case if you have any support questions for them. The general process is outlined below:
|
Artifacts
Useful Development Links |
Development tools and plug-ins
Please install and set up the following:
- Eclipse IDE for C/C++ Developers
- If you already have Eclipse installed, you can alternatively install the Eclipse C/C++ development environment (CDT) into your existing Eclipse installation
- Create and switch to a new Eclipse workspace for Thunderforce unless if you aren't using Eclipse for anything else
- This can be accomplished through File -> "Switch Workspace..."
- Optionally, you can create a shortcut to start the Thunderforce workspace directly by running eclipse or eclipse.exe with "-data" followed by your workspace folder path
- Example: eclipse.exe -vmargs -Xmx512M -data d:\Devel\Thunderforce
- Eclipse Plug-Ins
- Adobe JSEclipse
- Registration required, unfortunately
- You can use BugMeNot for the Adobe account if you want to
- Subclipse
- Installation URL for Eclipse's built-in installer is http://subclipse.tigris.org/update_1.2.x
- AnyEdit Tools
- Installation URL for Eclipse's built-in installer is http://andrei.gmxhome.de/eclipse/
- Only AnyEdit is needed. The other tools aren't needed unless if you want to install them
- Configure AnyEdit to convert all tabs into spaces
- This is in Window -> Preferences, General/Editors/AnyEdit Tools
- Installation URL for Eclipse's built-in installer is http://andrei.gmxhome.de/eclipse/
- UMLet UML editor
- Oribe XML (being deprecated; I think Eclipse has its own XML editor now..)
- Adobe JSEclipse
Thunderforce Eclipse project
The following steps walk you through the process of importing the Thunderforce Eclipse project into your workspace:
- In your Thunderforce Eclipse profile, select "Import..." from the "File" menu to begin the process
- Within the "Other" group, select "Checkout Projects from SVN" and press the "Next >" button
- Create the https://www.moonlightdesign.org/thunderforce/svn repository location if it isn't already created. Press the "Next >" button
- When asked to select the folder to be checked out from SVN, select the "trunk" folder and press "Next >"
- Eclipse should automatically detect that the project is named Thunderforce. Press the "Finish" button to complete the project setup
The Thunderforce Eclipse project is presently split into three main folders:
- architecture
- The high-level architecture and any detailed design diagrams live in here
- extension
- This is the Thunderforce extension for Thunderbird. The subfolder structure matches Mozilla's extension folder structure guidelines
- tests
- Integration and unit tests live in this folder, which is structured as a Thunderbird extension. Because these tests are designed to test Thunderforce, this extension requires that the Thunderforce extension is also installed in a Thunderforce profile
Mozilla Thunderbird debug-enabled build
If you are not using a Linux or Apple Mac OS X system for development, you will need to download and install CVS, GNU Make, GNU GCC, and likely other build tools. I'm using Novell openSUSE 10.2 as my desktop at both home and work, and I haven't yet tried to compile Thunderbird on Windows. Cygwin might be a possible solution, and this page might help with that. Please feel free to update this page if you know how to do this in Windows. If you are running Linux, please be sure to add noatime and nodiratime to your filesystem mount options to make handling the Mozilla codebase as fast as possible.
- Create a new standard make C++ project in your Thunderforce Eclipse workspace
- In the "File" menu, select New -> "Project..." and select "Standard Make C++ Project" in the C++ group
- Name the project "mozilla" without the quotes (case is important in case-sensitive filesystems) and press the "Next >" button
- Accept the defaults and press the "Finish" button
- Close Eclipse until you are finished with the remaining steps
- Download the 2.0 branch of Thunderbird using CVS in the command line
- Yes, you will need to use the command line and have cvs or cvs.exe in your path. Mozilla uses a Makefile to download the relevant parts of the tree for a given project
- This process was adapted from Mozilla's CVS build instructions
- In a command prompt or shell, change the current directory to your Thunderforce Eclipse workspace's folder
- That folder should have at least two folders: Thunderforce and mozilla
- Download the client.mk file with the following CVS command, exactly as it is written:
- cvs -d :pserver:anonymous@cvs-mirror.mozilla.org:/cvsroot co -r THUNDERBIRD_2_0_0_6_RELEASE mozilla/client.mk
- Change the current directory to mozilla
- cd mozilla
- Download Mozilla Thunderbird's source code with CVS by running the following command:
- make -f client.mk checkout MOZ_CO_PROJECT=mail
- Configure Thunderbird to build with debugging options enabled
- Create a new text file in the root "mozilla" folder named .mozconfig (include the dot prefix)
- In this file, add the following items as lines of text:
. mail/config/mozconfig
*ac_add_options --enable-debug
*ac_add_options --disable-optimize
- In this file, add the following items as lines of text:
- Run the Autoconf configure script
- Linux or Cygwin: ./configure
- Windows: Please feel free to contribute this information here
- Create a new text file in the root "mozilla" folder named .mozconfig (include the dot prefix)
- Build Mozilla Thunderbird with the following command in the root "mozilla" directory:
- make
- Launch Eclipse and see the "mozilla" project populated with Thunderbird's source code
- You can now easily open files with Ctrl+Shift+R, see where a definition for an identifier in a C++ file exists, find references, and other operations that you can do in Eclipse with C and C++ files
Thunderforce testing profile in Thunderbird
To separate your production email from Thunderforce testing, we suggest that you create a separate Thunderbird profile for Thunderforce testing. You can also use your main Thunderbird profile, but you then run the risk of damaging your email during Thunderforce development.
- Ensure that Thunderbird is not running by closing all Thunderbird windows
- Start the Thunderbird profile manager in the command line: thunderbird -no-remote -ProfileManager
- Create a new profile named ThunderforceTest and press the Exit button to close the profile manager
- The Eclipse instructions refer to the ThunderforceTest name
- Optionally create a shortcut to launch the ThunderforceTest profile, which will work even when you have your default Thunderbird profile running
- The Thunderbird command to run in this shortcut: thunderbird -no-remote -P ThunderforceTest
- In your ThunderforceTest profile's extensions subfolder, create the two following text files. The file names that you will need to use are in bold:
- thunderforce@moonlightdesign.org
- This file will contain the full absolute file path to the Thunderforce extension folder, such as d:\Devel\Thunderforce\Thunderforce\extension
- thunderforcetest@moonlightdesign.org
- This file will contain the full absolute file path to the Thunderforce tests folder, such as d:\Devel\Thunderforce\Thunderforce\tests
- Both of these files will contain one and only one line of text
- thunderforce@moonlightdesign.org
- Download the following essential development extensions for Thunderbird into a temporary folder, such as your desktop
- Launch your new ThunderforceTest profile from the command line or from your shortcut
- If launching from the command line, run: thunderbird -no-remote -P ThunderforceTest
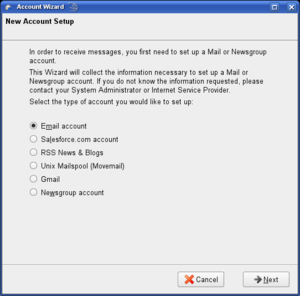
- When no accounts exist, Thunderbird automatically displays the account setup wizard. You should see a "Salesforce.com account" option as the second option if everything has been set up properly
- Close the account wizard by clicking on the "Cancel" button and then click on the "Exit" button. Thunderbird will remain open
- Install the three extensions that you had downloaded
- Extensions can be installed by selecting "Add-ons" in the "Tools" menu and then clicking on the "Install..." button in the "Extensions" tab

Eclipse configurations for running and debugging Thunderforce
The following instructions guide you through the process of creating Eclipse configurations for running an debugging Thunderforce.
- Before trying out new code in Thunderforce, it is advised that you run the basic unit tests to ensure that you don't get silly JavaScript compilation errors and that your new code passes basic positive and negative test cases.
You should repeat this process for each unit test and runtime configuration. The following run and debug configurations are advised:
- Thunderforce: Run Thunderbird with the ThunderforceTest profile. This is meant for manual integration and functionality testing
- Thunderforce Basic Tests: Run the simple unit and sanity test cases to ensure that your code change compiles properly and didn't break anything obvious. This is typically run before trying out a new change with the full Thunderforce run configuration
- Thunderforce Normal Tests: Run the normal unit and integration test cases. When tests of this type are written, running this will likely become a check-in requirement
- Thunderforce Extra Tests: Run the integration tests that typically take a long time to run. These tests are important, but do not need to be run with every single change
- Thunderforce All Tests: Run all of the aforementioned tests. CruiseControl might be used to automatically run this in a cycle whenever new code exists
To create a Thunderforce run configuration, perform the following steps:
- Select "Run..." from the "Run" menu in Eclipse
- Right-click on "C/C++ Local Application" and select "New" from the pop-up menu
- Give this run configuration a meaningful name, such as a name mentioned above (Thunderforce, Thunderforce Basic Tests, etc)
- Select "mozilla" as the project for this run configuration
- Select "dist/bin/thunderbird-bin" or "dist/bin/thunderbird.exe" in the "C/C++ Application" field, depending on which operating system you are running. The "Search Project..." button can be used to located thunderbird-bin or thunderbird.exe
- Use "-no-remote -P ThunderforceTest" without the quotes as the program arguments in the "Arguments" tab
- Use "${workspace_loc:mozilla}/dist/bin" without the quotes as the working directory
- Add the following environment variables if using Linux. If you are using Windows, skip this step
Variable Value LD_LIBRARY_PATH ${workspace_loc:mozilla}/dist/bin:${workspace_loc:mozilla}/dist/bin/plugins LIBRARY_PATH ${workspace_loc:mozilla}/dist/bin:${workspace_loc:mozilla}/dist/bin/components moz_debug 1 moz_debugger gdb MOZ_PROGRAM ${workspace_loc:mozilla}/dist/bin/thunderbird-bin MOZILLA_FIVE_HOME ${workspace_loc:mozilla}/dist/bin - Leave the environment variable "Append environment to native environment" choice selected